

Four Frontend State Management Patterns

I am a developer currently living in Greenville, SC, USA. When I'm not coding, or writing about coding, I enjoy playing tennis and chess competitively.
State management is a key concept in modern front-end frameworks, and often a headache for developers. It can be difficult to write quality code in a front-end framework without a good understanding of the existing state management solution, and why it may have been chosen over the alternatives. Choosing one for a new application is also a challenge, as it must be ready for the twists and turns your project takes.
Originally, I wanted to find the absolute best solution for any project so that I could just learn that and continue building, but like many decisions in software development, the answer is - "It depends". In this post, I'll share the overarching patterns I've noticed along with technologies that implement them. Examples are shown for React, but there are similar solutions available for other frameworks.
I've created a functional demo for the examples shown in the following sections where you can follow along if you like. Here is the demo and Github.
What is State Management?
Many front-end frameworks use declaratively defined components that change over time. Components have an internal state that dictates their behavior at any given moment. A component's state does not live in a vacuum - it nearly always needs to communicate with other components' state data. Changing one component's state often requires updating many others in a domino effect, so managing and updating state is critical to controlling your app's behavior. As more components are added, it becomes more important to have a good state management solution in place.
Prop Drilling
As I mentioned, components have an internal state that can be controlled using built-in features. In React, a stateful value can be created inside a component using the useState hook. This value can be used to control the behavior of the component, such as conditionally rendering different outputs based on the state. That's great, but we usually need to share the state with other components so they can update in unison based on input from the user or database. Components can share state with child components (components rendered in their output) via the props object. The children can now use that value to control their own behavior and optionally pass it down to their children also.
This is a simple pattern that can work for small projects, but the main issue with this approach is prop drilling, which is not unique to React. If you have a complex app with many layers of components in the tree, and a low-level component needs the state of a high-level component, you will have to drill down from the top level and pass the state as a prop to every intermediate component along the way, even if those components will not use the value themselves.

This is an example to show the state in the Parent component being used by a Grandchild component. We have a simple toggle button that is controlling the state in the parent. Yes, this specific example could be made in a single component, but let's imagine this is a small part of a larger state where there are many settings controlled by many nested components.
// PropDrilling.tsx
import { useState } from 'react'

interface Props {
  isToggled: boolean
  handleClick: () => void
}

export const Parent: React.FC = () => {
  const [isToggled, setIsToggled] = useState(false)

  const handleClick = () => {
    setIsToggled(!isToggled)
  }

  return <Child isToggled={isToggled} handleClick={handleClick} />
}

export const Child: React.FC<Props> = ({ isToggled, handleClick }) => {
  return <Grandchild isToggled={isToggled} handleClick={handleClick} />
}

export const Grandchild: React.FC<Props> = ({ isToggled, handleClick }) => {
  return (
    <>
      <p>{isToggled ? 'ON' : 'OFF'}</p>
      <button onClick={handleClick}>Toggle with Prop Drilling</button>
    </>
  )
}
In order for Grandchild to have access to update the state, we pass isToggled and handleClick as props from Parent to Child, and again from Child to Grandchild. The props object argument in Child and Grandchild is destructured in this example to simplify access to the props themselves.
Complexity varies slightly depending on if you are using a framework with one-way data binding (React) or one with two-way data binding (an option in Svelte). Data flows one way in React - from parent to child, whereas in a two-way data binding framework, updates to the parent or child will update the other. With one-way binding, you also need to pass a function to update the parent state down to the child as a prop, as shown in the example. There are pros and cons to each method of data binding, but that is a separate discussion. The important part is that sharing data around the tree easily is commonly needed.
Each child that accepts props is logically linked to its parent, so prop drilling creates a chain of dependencies that quickly becomes tedious to maintain. The rest of the patterns show different ways of avoiding this problem.
Context API
In programming, the term "context" refers to the specific environment or set of conditions that code is run in. React has adopted this term for its Context API, which allows you to create a state context for your component tree. A context can be created at any point in the tree, then any child components that are wrapped inside the context provider will have access to the context's state.
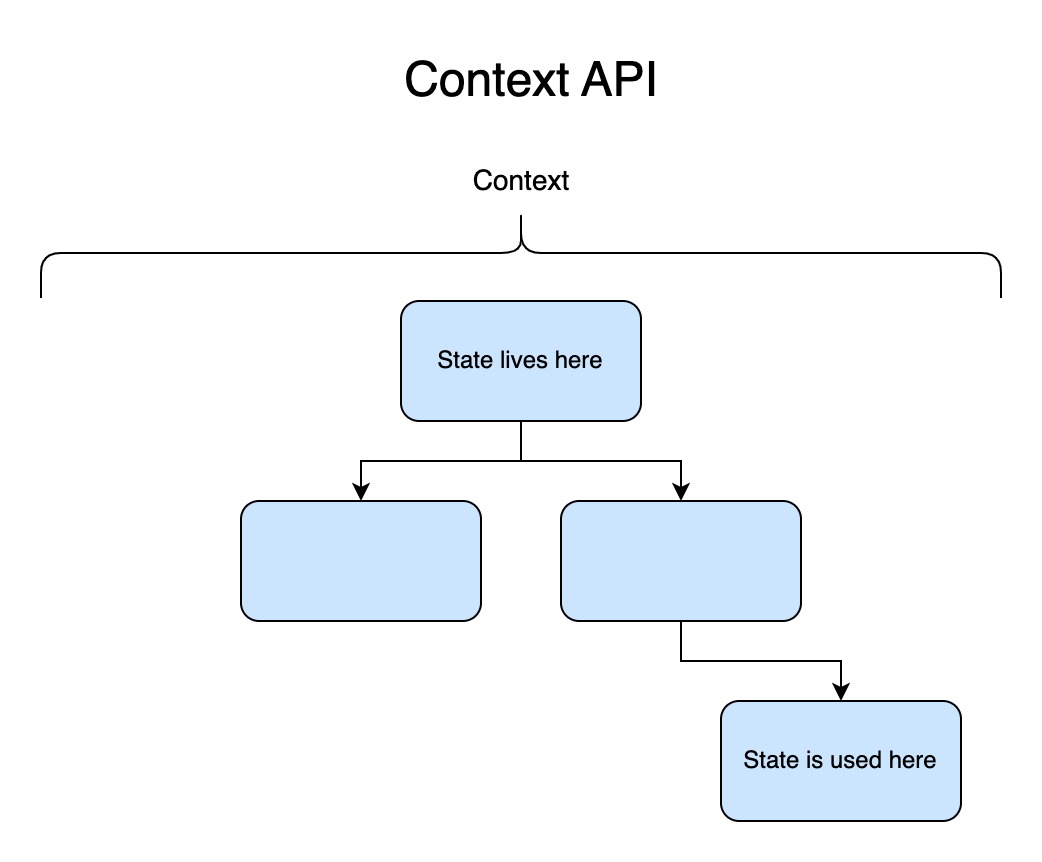
Context is usually created at the top level so that the entire tree can have access to it. This bypasses the need for prop drilling between every intermediate component. The state still lives in the tree, it is just easier to access from the components.
Here is our previous example, rewritten using the Context API.
// Context.tsx
import { createContext, useState, useContext } from 'react'

interface ToggleContextProps {
  isToggled: boolean
  handleClick: () => void
}

const ToggleContext = createContext<ToggleContextProps>({
  isToggled: false,
  handleClick: () => ({}),
})

export const Parent: React.FC = () => {
  const [isToggled, setIsToggled] = useState(false)

  const handleClick = () => {
    setIsToggled(!isToggled)
  }

  return (
    <ToggleContext.Provider value={{ isToggled, handleClick }}>
      <Child />
    </ToggleContext.Provider>
  )
}

export const Child: React.FC = () => {
  return <Grandchild />
}

export const Grandchild: React.FC = () => {
  const { isToggled, handleClick } = useContext(ToggleContext)

  return (
    <>
      <p>{isToggled ? 'ON' : 'OFF'}</p>
      <button onClick={handleClick}>Toggle with Context</button>
    </>
  )
}
The toggle state and click function are still stored in the state at the Parent level, but they did not have to be passed down to Child or Grandchild as props. Grandchild was able to access them with the useContext hook.
Common use cases for this include global settings like color theme and current user account permissions. Context is accessible in React without any additional libraries, and it can be combined with the useReducer hook to add even more control to state updates.
More information on the Context API is shown here.
External Store
Another approach to sharing state without prop drilling is to separate the state from the tree entirely. A store is a home for your application's state outside of the component tree. Many libraries host state outside of the component tree and provide various ways of interacting with it.
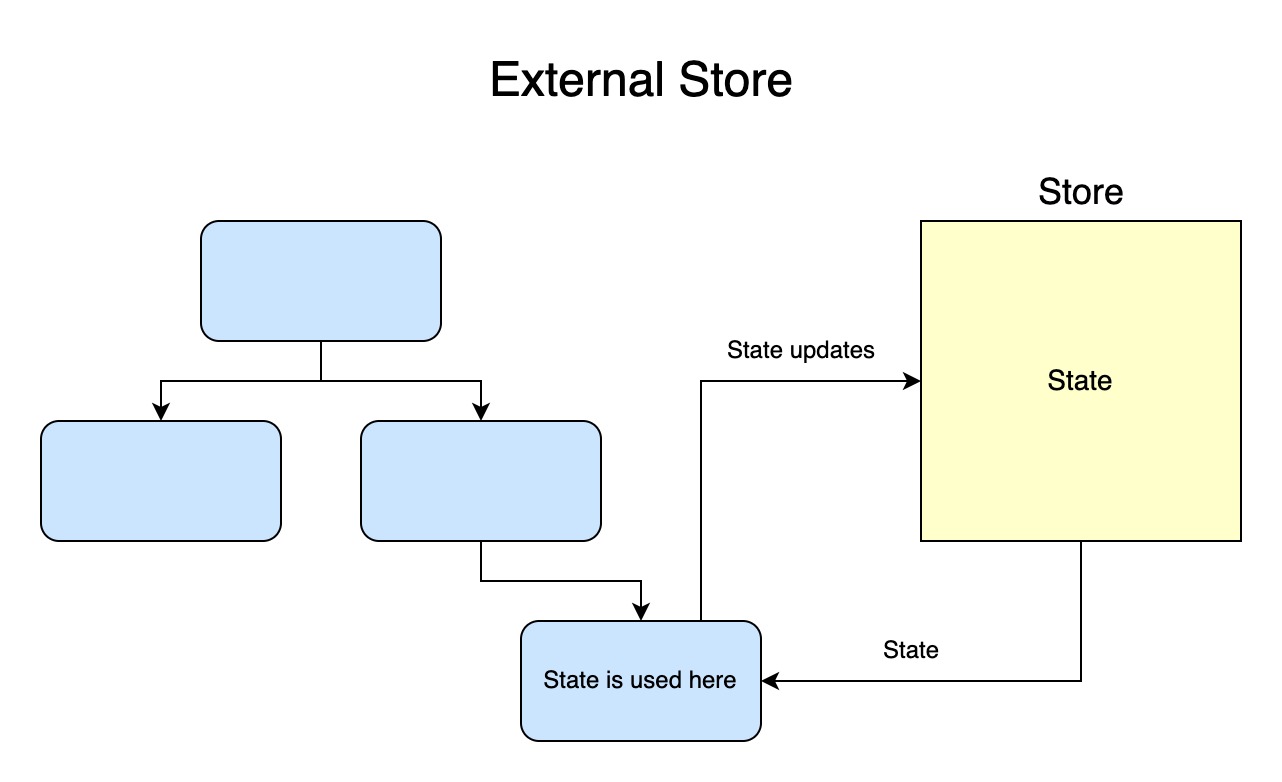
Global variables are typically considered a bad practice in programming because they create dependencies between components using them, so what makes external stores different? Rather than merely creating a global variable that can be updated in any capacity from anywhere in the code, these libraries add guardrails so that state interactions are well-defined and testable. In Zustand and other libraries, you can create a store and define functions for updating it in a specific manner. There are still logical dependencies that would occur in any global variable scenario, but many find that the simplicity of this solution when storing complex data like your application state makes it worth it compared to the alternatives.
Here is our toggle, now written using Zustand.
// Zustand.tsx
import React from 'react'
import { create } from 'zustand'

interface ToggleState {
  isToggled: boolean
  handleClick: () => void
}

const useToggleStore = create<ToggleState>(set => ({
  isToggled: false,
  handleClick: () => set(state => ({ isToggled: !state.isToggled })),
}))

export const Parent: React.FC = () => {
  return <Child />
}

export const Child: React.FC = () => {
  return <Grandchild />
}

export const Grandchild: React.FC = () => {
  const { isToggled, handleClick } = useToggleStore()

  return (
    <>
      <p>{isToggled ? 'ON' : 'OFF'}</p>
      <button onClick={handleClick}>Toggle with Zustand</button>
    </>
  )
}
Notice how the state now lives in the store and not in the Parent component at all. The handleClick function uses Zustand's set function, which accepts the current state of the store and returns the updated portion of the state. Zustand merges the updated portion with the overall store, and the Grandchild component subscribes to the latest version of the state. See more information on this here.
Many state management libraries with an external store are inspired by our next pattern but with an emphasis on simplicity.
Flux Model
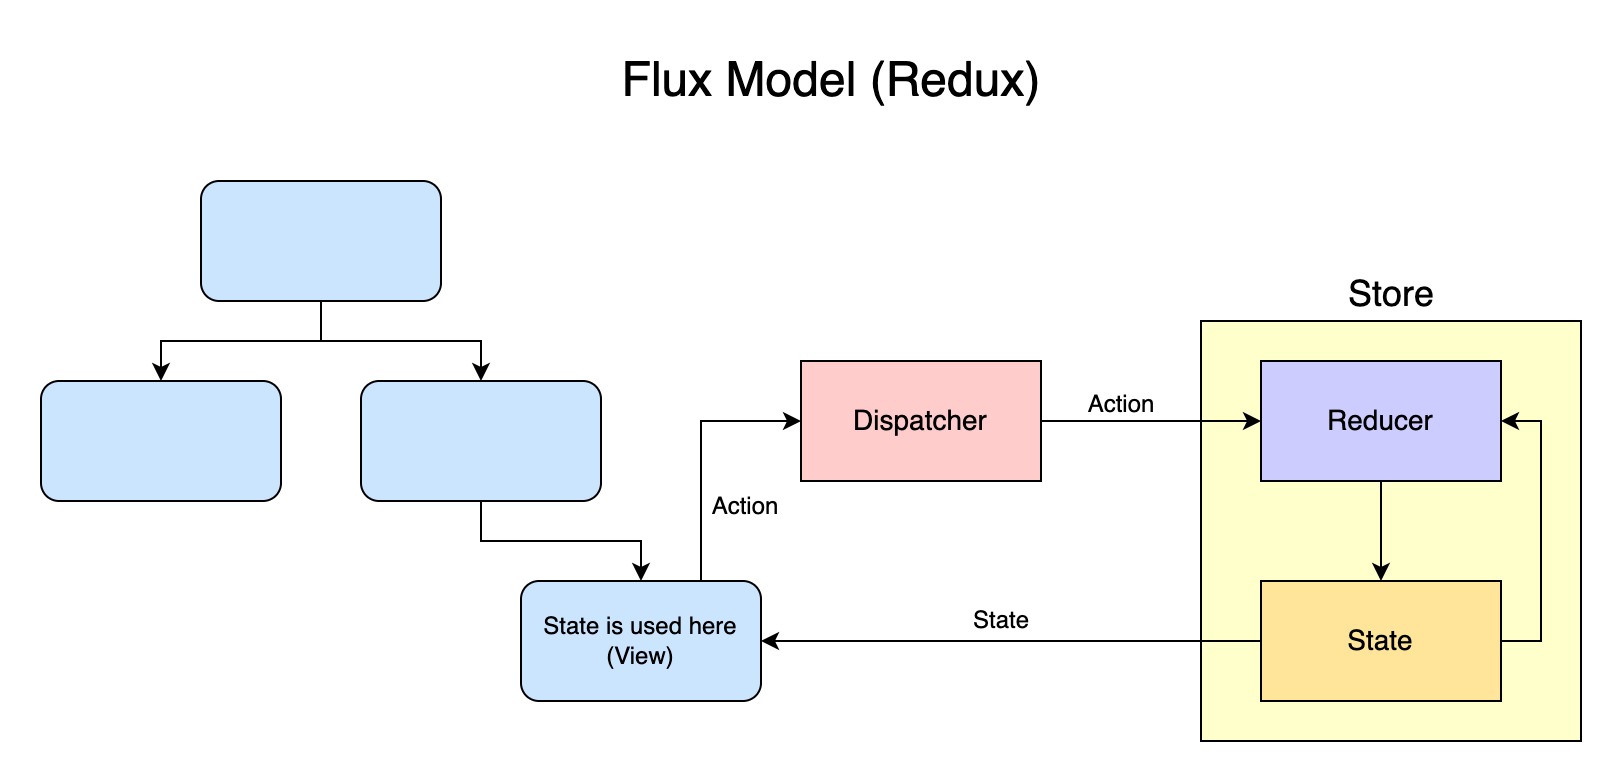
No state management article would be complete without the Flux model, which is almost synonymous with the Redux library for React. The Flux model also includes an external store to hold state outside of the component tree, but it uses a more structured, one-way data flow to manage state predictably. It consists of four key parts.
Actions - The different events or user interactions that can occur in an application.
Dispatcher - The central hub that receives actions and applies (dispatches) them to the appropriate store.
Stores - A store holds the application state and defines logic for handling actions and updating the state. There can be multiple stores, and they listen for actions from the Dispatcher and update their state accordingly.
- Reducers are functions that accept the current state and incoming action and return the updated state. Reducers aren't explicitly defined in the Flux model, but the concept is still important here.
Views - This represents the user interface, specifically the components in the framework. They subscribe to changes in the store so the current state is always shown. Views are responsible for re-rendering content on the page when the state in a store is updated.
Here is our example using Redux, with the officially recommended Redux-Toolkit library as well. Redux-Toolkit is an abstraction over Redux with its own functions to simplify the configuration.
With Redux-Toolkit, a store is broken up into slices to divide the state into simpler pieces. First, we create a slice, set an initial state value, then add our actions and reducers. We have an action named toggle which corresponds to a reducer function that flips state.isToggled when the action is dispatched. Typically, the slice name would not have the word "slice" in it, but I wanted to make that more clear when it is used later. Reducer functions are automatically created by the createSlice function, and it is common to export those as the default export.
// toggleSlice.ts
import { createSlice } from '@reduxjs/toolkit'

export interface ToggleState {
  isToggled: boolean
}

const initialState: ToggleState = {
  isToggled: false,
}

const toggleSlice = createSlice({
  name: 'toggleSlice',
  initialState,
  reducers: {
    toggle: state => {
      state.isToggled = !state.isToggled
    },
  },
})

export const { toggle } = toggleSlice.actions
export default toggleSlice.reducer
Next, we configure the store itself. The store has a root reducer that aggregates the reducers from each slice.
// store.ts
import { configureStore } from '@reduxjs/toolkit'
import toggleReducer from './toggleSlice'

export type RootState = ReturnType<typeof store.getState>

const store = configureStore({
  reducer: {
    toggleSlice: toggleReducer,
  },
})

export default store
Finally, we have the components or views in the Flux model. The Redux Provider allows the store to be accessed by all nested components. Components can use the useSelector hook to specify what state to pull from the store. This subscribes components to the store so that as actions are dispatched and the state is updated, components will update automatically as well. We also import our toggle action from toggleSlice.ts so that we can dispatch it from our component.
// Redux.tsx
import React from 'react'
import { useSelector, useDispatch, Provider } from 'react-redux'
import store, { RootState } from './store'
import { toggle } from './toggleSlice'

export const Parent: React.FC = () => {
  return (
    <Provider store={store}>
      <Child />
    </Provider>
  )
}

export const Child: React.FC = () => {
  return <Grandchild />
}

export const Grandchild: React.FC = () => {
  const isToggled = useSelector((state: RootState) => state.toggleSlice.isToggled)
  const dispatch = useDispatch()

  const handleClick = () => {
    dispatch(toggle())
  }

  return (
    <>
      <p>{isToggled ? 'ON' : 'OFF'}</p>
      <button onClick={handleClick}>Toggle with Redux</button>
    </>
  )
}

export default Parent
The Flux model is a powerful way to manage state, and Redux is the choice for many enterprise React applications. Redux is overkill for our example, but it shows how much control you have at each step of the process. Also, Redux has a ton of additional functionality that is beyond the scope of this article. The robust structure does add complexity, so it's worth doing some research to determine if it is right for your project.
Conclusion
If you are searching for "what state management solution is the best", then you're going to get many different answers. It is common to use a combination of built-in component state where it makes sense and one of the other patterns I mentioned for more complex state. There are also technologies not mentioned that combine elements of these patterns in various ways. The best choice for you comes down to your application's business requirements and the other technologies in your stack.
Did I miss any patterns? Leave a comment and let me know!